AECP: Easy Die Cutting Techniques
Hello,
I am very happy to share what I learnt in the “Easy Die Cutting Techniques” course. I die cut from standalone dies as well as coordinating dies. Die cutting is really fun, and in today’s blog, I used my dies in different ways.
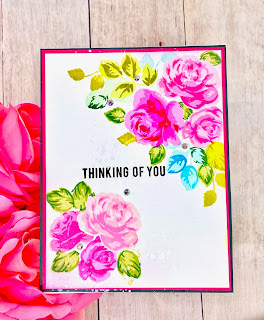
My first card uses Altenew’s Build-A Flower: Stargazer stamp set and coordinating dies as well as Altenew’s Layered Floral Cover die A. I used the Layered Floral Cover die A as a stencil for my background of my card panel.

After stenciling with a light purple Altenew’s ink, I set my panel aside and stamped the images from the Stargazer stamp set. I die cut the images using the coordinating dies.


I prepared a A2 card panel and adhered a strip of gold mirror card stock and a thin strip of black glitter card stock on the left of the card. I stamped the small flowers on the background and foam mounted my floral image and leaves. I gave my floral some sparkle with my Nuvo glitter pen and added a few sequins for some interest.
My second card showcases Altenew’s Build-A-Flower: Hellebore stamp set and coordinating dies. I used Altenew’s Layered Floral Cover die A in this card as well. But this time, the cover die is used in my dry embossing technique.

I cut a smaller card stock to 4” by 5.25” and dry embossed the cover die A on the whole card stock. Then, I stamped the floral images images and die cut them with the coordinating dies. I foam mounted them towards the right of the card panel and glued a strip of black glitter card stock and a mirror gold card stock below the floral images.


I cut a card stock to 4” by 5.25” and stamped the pine leaves and bells. Once all the images are stamped, I ink blended a light green ink toward to bottom of the panel and splattered the same green ink on the panel.


I dry embossed my panel using the leaf clusters I die cut earlier onto my panel. This leaf impression on my panel created a cool and interesting effect. I added a strip of silver glitter card stock and a thin layer of gold mirror card stock onto the left of the card panel. Then, I foam mounted my picture panel onto the card front. I added some shine on the bells with some diamond stickles and also some green gem stones on the pine branches. I love how the leaf clusters created the embossed effect on my card.
Coordinating dies help to cut precise images and saves time in crafting. I love how the stand-alone dies can also be used as stencils and create dry embossed effects on my projects. Dies are fun and versatile in so many ways. I had a blast using them.
Have a wonderful week,
Juliet

The first one is my favourite!! It looks so pretty! The other two are gorgeous too! Thank you for submitting your work to the AECP assignment gallery.
ReplyDelete