AECP: Irresistible Inking Techniques
Hello,
Today’s post is all about inking techniques. I love using Altenew’s inks in my card projects. I love that the ink colors come in four gradients and they are really easy to mix and match as well. The inks are also suitable for water coloring.
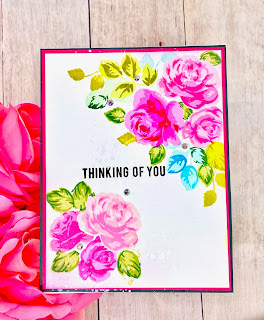
My first card uses Altenew’s Build-a-flower: Gardenia stamp set. I cut my panel to 4” by 5.25” and stamped the Gardenia on the top and bottom of the panel.

I used Altenew inks with the layering stamps to add depth and dimensions to the images without adding any bulk to the card. I cut out an additional flower and made a mask to stamp the leaves around the flower.


I added direct-to-paper inking on the edges of my panel to define the edges. With the defined edges, my panel really pops from the white card front. Then, I stamped a sentiment from the same stamp set and foam mounted it on the card front. I added a few sequins for some interest.


I adhered a piece of gold mirrored card stock and black glitter card stock on the left of the card front. Then, I wrapped a piece of twine on the card panel and foam mounted it on the card front. I also added a few sequins for some shine.
My third card features Altenew’s Build-a-flower: Canterbury Bells and coordinating dies. To create the background of my card, I inked some green and yellow ink directly onto my glass work surface and spritzed some water to create a soft watercolored effect. Once it is dry, I foam mounted it onto the card front.

Then, I die cut a smaller rectangle and embossed it using Altenew’s 3D embossing folder Garden Harmony. I rubbed the surface of the embossed area lightly with some green ink.


Then, I tied a piece of twine on the embossed panel. I stamped and die cut the Canterbury image and foam mounted on the embossed panel. I added a few green spatters toward the bottom of my card and also added some shine on the flowers using a Nuvo glitter pen. To finish my card, I adhered a sentiment strip and a few baubles.
Playing with the ink was really fun. I can use the inks to create my own colored background, color the images with it, stamp with it and even do direct-to-paper techniques with it. I can’t do without inks.
Have a wonderful week,
Juliet


Beautiful work! Love the inky goodness!! So much eye candy!! Thank you for submitting your work to the AECP assignment gallery.
ReplyDelete