AECP: Impressive Heat Embossing
Hello,
Do you love to heat emboss? Do you have lots of different colored embossing powder? Today’s blog post is about using heat embossing in my handmade cards. Armed with some “basic” embossing powder, such as white, clear, silver and gold embossing powder, I will show you how embossing can add more fun in card making.
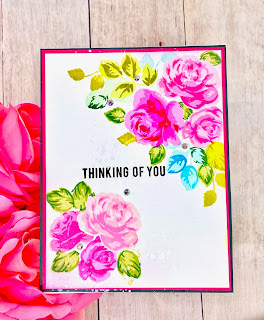
I love batik. From batik fabric to painting batik cards. The first card uses Altenew’s Floral Shadow stamp set to create a batik background. Using some distress oxide inks, I blended the card panel with colors I like - such as pink, blue and green.

I stamped the images from Floral Shadow and embossed it in clear embossing powder. Then, I used a darker blue distress oxide ink to blend onto the whole panel. Using a dry cloth, I buffed the embossed image to remove any excess ink. The embossed images resist the dark blue distress oxide ink and shows the ink under the images. This creates a batik effect that I like.


I sprinkled some clear water onto the card to create a spritzed effect. I added a strip of gold mirror card stock and a sentiment above it. I added a dark card stock behind the panel and foam mounted it onto a card front. Finally, I added a few sequins for some added interest.
My second card features Altenew’s Woven Stripes background stamp set and Fancy Thanks die. I embossed my entire panel with the background stamp using clear embossing powder. Then, I cut out a circle frame and added some distress oxide ink within the circle. The embossed area will resist the ink.

I die cut 3 “thanks” die and stacked them together. Using my Versamark stamp pad, I stamped the lower half of the thank word and embossed it in Altenew’s gold embossing powder.


I glued the die cut towards the lower half of the circle and added a sentiment below it. I added a few clear sequins for some bling as well.
My third card uses Altenew’s Build-a-flower: Coneflower as well as Waffled Diamond embossing folder. I embossed the front panel with the embossing folder first. Then, I glued an oval frame on top of the panel. I set these aside and went on to create my florals.

With the help of my MISTI tool, I was able to stamp the layering stamps with Altenew’s crisp inks. I added gold embossing powder only for the center of each flower. This added some interest and shine on each of the flowers.


After cutting the flowers with the coordinating dies, I arranged the flowers along the oval frame with the help of some 3D zots adhesive. I like it that the flowers look more dimensional. I also added some black enamel dots for some contrast. To finish this card, I added a sentiment and foam mounted it at the bottom of the panel. I foam mounted my entire panel onto a card front and that completes this card.
I had so much fun using embossing powder and all of Altenew’s products. The use of embossing powder certainly improves the look and texture of the cards. I think you should try it too.
Have a great week,
Juliet

OH MY GOODNESS! Just when I thought it couldnt get any better, you prove me wrong! AHMAZZZINGGGG
ReplyDelete