AECP: Masking Unleased
Welcome back,
Masking is a fascinating technique that adds the WOW factor in card making - creating unique cards each time. I will be using my post-it pads for all my masking needs. However, you can also use printing paper with some tack behind it or professional masking papers for all your masking needs.
My first card uses Altenew’s Vintage Roses, Vintage Flowers stamp sets and Fine Frames Diamonds Die set. I die cut the third smallest diamond on a post-it paper and adhered it to the center of my panel. This will create a frame for my images. Then, I stamped the floral stamps around the diamond using Altenew’s ink pads.

I created a mask for each floral before stamping other elements such as smaller leaves and flowers around it. I continue to do this until I finish stamping around the perimeter of the diamond.


I blended some light yellow around the diamond perimeter as well. When all the stampings are done, I removed all the post-it masks on the images. I stamped a sentiment at the center of the diamond and embossed it in Altenew’s gold embossing powder. I mounted my panel on a black card stock and then foam mounted them onto my card front. I added a few sequins for some added bling as well.
My second card showcases Altenew’s Oriental Orchid and Versatile Vases stamp sets. I like to create a picture that uses Altenew’s gorgeous florals stamps on the vase. In doing so, I stamped the picture of the vase on my panel first. After that, I stamped the orchids above it. To create a cluster of orchids, I had to create masks for each orchid, starting from the one right in front.

After stamping the orchids, I also stamped the leaves and stem. To create the water in the vase, I taped a masking tape across the vase and blended some blue ink over it. Similarly, I taped another masking tape toward the bottom of the panel to create a table, and blended some grey ink.


I stamped a sentiment close to the vase. Then, I foam mounted my panel onto the card front. I added a thin strip of colored card stock toward the left of the panel for some added interest. I used Nuvo glitter brush pen on all the orchids to finish my card.
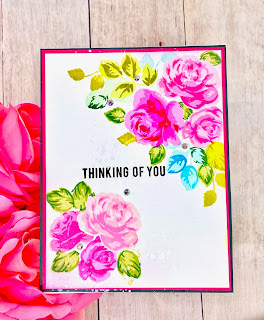
My third card is heavily inspired my Kristina Werner. I used Altenew’s Peony Bouquet stamp set to create a no-line watercolor card. Using some water colored paper, I watered down the paper and added a faint amount of yellow and pink as the background of the paper. I stamped the first peony using Antique Linen distress ink.

I created a mask for this first image and went on to stamp the second peony beside it. I added smaller leaves and floral buds around it as well. Using Altenew’s 36 half pans watercolor, I colored all the images on my panel. I love that the colors are so rich and vivid.


Masking takes time and effort. However, it is worth every minute once the card is completed. The pictures created are unique and I have enjoyed myself in creating them. This brings me to the end of my level 2 course. I am looking forward to learning much more in my future classes in Altenew!
Have a great week,
Juliet

BLOWN AWAY!!! SO SO SO GORGEOUS!!!!
ReplyDelete