Hello,
Today is the day for me to post my projects for my Level 2 AECP final challenge! I am required to select any 3 components from the classes in Level 1 or 2 and come up with 4 masculine cards with the following themes; birthday, Love/thinking of you, anniversary and encouragement. I also need to complete an upcycled or recycled project. The components I chose are; “Clean and simple boutique cards”, “easy die cutting techniques” and “with a twist”.
“Clean and Simple boutique cards” are created with a minimal look that creates the “wow” factor for the card recipients. I like it that my cards use minimal supplies to bring out the maximum satisfaction for the recipients. I also like to leave “white spaces” on my cards for the “clean look”.
“Easy die cutting techniques” help put my dies to good use. I like that the die cuts can be used to create the main highlights of my cards and also create the composition that I like.
“With a twist” allows me to use my current crafting supplies to come up with different ways to spice up my projects. I like it that I am able to make cards that are interactive and are different from the regular A2 cards.
These 4 cards uses different Altenew’s products and some other crafting supplies I own. I made 4 different interactive cards to match the themes given. I love to use Altenew’s vibrant inks as well. They always add the vibrancy and “oomph” to my cards.
Birthday Card
I used Altenew’s Layered Cupcake stamp set, Party time stamp set and Celebrate with Cake die set for my birthday card. I first stamped the layering cupcake stamps onto a white card stock and fussy cut out the image. Setting the cupcake aside, I proceeded to prepare the front panel of the card.
I cut a card stock to 3 7/8” by 4 7/8” and stamped the images from Party Time stamp set using Altenew’s ink pads. After that, I used the same stamp images on the inside of the card and die cut the cake images from Celebrate with cake die set.
I added a blue card stock for the backing of my front stamped panel. I adhered the cake die cuts together onto 2 strips of card stock measuring 1/4” ink thick.
I added the cakes to the center of the card to create a pop up cake. I added 2 die cut leaves around it and stamped a sentiment as well. Once the inside of the card is completed, I added a wobble spring for the cupcake on the front of the card.
The spring allows the cupcake image to wobble and this creates some interest. I also stamped a sentiment near the cupcake. This card is suitable for birthday boys. The pop up cake inside the card adds the element of surprise for the recipient.


There is enough space on the inside of the card for a personal message and when the card is closed, it does not add to any bulk as well. The white space on both the front and inside of the card gives it a clean and simple effect.
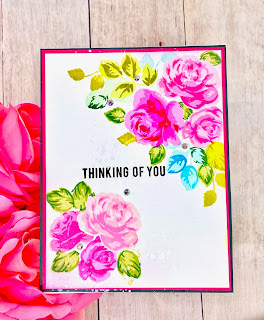
Love/Thinking of you Card
My “Love/Thinkin of you card” uses Altenew’s Parlor Palm die set and Monstera 3D die set. I die cut all the leaves and pots using different green card stock and set them aside. Using Lawn Fawn’s Reveal Wheel die, I die cut the front panel with an open window.
After I die cut the front panel and the plants, I used Altenew’s ink pad to decorate the front panel. I stamped the stars and dots from Altenew’s Kind words and Kind Confetti stamp sets.
I wrote the words “love ya”, “hug!” And “kiss kiss” since I do not have the suitable stamps for this card. I added a blue backing for the front panel before assembling and foam mounting the entire panel onto a card front.
I added 4 wobbly eyes for the plants for added interest. The love sentiments will display on the window when the wheel is turned each time. I left ample white space on the front of the card and it gives it a clean look with enough “wow” factor.
Anniversary Card
The anniversary card features Altenew’s Birds of a feather stamp set and coordinating dies. I cut out a panel that is 6 3/4” by 3 7/8” first. I stamped the first bird towards the right of the panel. I also stamped and die cut the second bird and attached a heart cut out onto its beak. I added some cloud with a stencil and stamped the branch for the bird to perch on. Then, I die cut a sliding panel on the left.


I cut out a strip of card stock to be about 6 3/4” by 3/4” for the interactive pull tab element. I added a small piece of foam tape on the top of the pull tab. I added the die cut bird on it.
I stamped the sentiment “Happy anniversary” after I traced the opening of the sliding panel. I adhered some foam tape to the back of the panel and erased the pencil markings.
The sentiment is hidden behind the pull tab and it will be revealed once the tab is pulled. This element of surprise adds on to the “wow” factor of the card.
As the branches were too short for the second (blue) bird to perch on, I added a few more strokes using my copic markers. I like it that when the tab is pulled, the second (blue) bird brings a heart to the first (green) bird, and reveals the sentiments as well. The white space on this card also gives it a clean and simple look that I like. I foam mounted the entire panel onto a 7” by 4 1/4” card front to complete the card.
Encouragement Card
Using Altenew’s Halftone Stars die and Simple Alpha die, I made my encouragement card. First, I die cut stars out of silver, black and gold glitter card stock. I cut out a 6 3/4” by 3 7/8” white panel and stamped the top corner with stars. I also swiped the corners with a yellow ink cube for some interest. I added a sentiment below the stars.
I cut out a window about 2 1/2” from the top panel to create a sliding window. Then, I cut out a strip of card stock to be about 5” by 1 1/2”. Using the Simple Alpha die, I cut out the words “way to go” in gold mirror card stock. Using a black card stock, I die cut a 2 1/4” circle and adhered the words on it. I arranged the stars on the front panel and pull tab and used some Zots 3D dots to stick the stars on them for some dimension.
I added some foam tapes around the back panel and adhered it to the front panel of a card. I added the surprise element behind some stars and when the tab is pulled, it will reveal the sentiment. This finishes my encouragement card.
Upcycle Project
I used a white T-shirt for my upcycle project. First, I stamped the bird images from Birds of a Feather stamp set. I added some flowers and leaves from Folksy Florals stamp set as well.
To prepare the t-shirt for sewing, I ironed some stabilizer at the back of the t-shirt behind the stamped images. Using an embroidery hoop, I sewed all the images with DMC thread.
Out of 6 threads, I used only 3 strands of thread for my sewing project. For each part of the birds, I used coordinating DMC thread colors.
I love that I was able to “convert” a white plain T-shirt to an embroidery T-shirt. The stamped images from Altenew helped me sew and embroider a beautiful image onto an otherwise plain white T-shirt.
I have learned a lot from all the courses I did with Altenew. I always have fun in creating my projects and the courses helped me put in more thoughts into my projects. I am definitely looking forward to future Altenew courses!
Have a wonderful week,
Juliet


Absolutely brilliant, Juliet!! The cards with the stars is just AMAZING!!! well done!! You did a fantastic job!!
ReplyDelete